Category: Uncategorized

  • A first month: Scaling a 25.000 user Mastodon instance using Kubernetes

    A first month: Scaling a 25.000 user Mastodon instance using Kubernetes

    Today marks the first entire month of my being a Mastodon server administrator. With Elon’s recent purchase, a lot of people went on a search for alternatives, and they found one: Mastodon.

    The critical difference with Mastodon is that everyone can own a social media platform, and at the same time, no one can. It’s a decentralized platform, communicating with other instances in the fediverse.

    I love everything technical and jumped at the opportunity to start my instance. The days since were a wild ride. If memory serves me well, the first days went like this:

    • November 4th: 60 users
    • November 5th: 600 users
    • November 6th: 6000 users
    • November 7th: 15,000 users

    You get the essence. It grew like crazy. Luckily, with me working primarily with Kubernetes, I decided from the beginning to set up Mastodon’s infrastructure using it. Still, I spent most of the first week getting bigger database servers and node pools. That’s also when I called for help from my good friend Mijndert Stuij. Combining our background, we have over 25 years of experience managing online software at scale.

    Early on, we wanted to open-source everything we did for my now-grown instance, toot.communityMijndert adopted all the infrastructure into Terraform, and I cleaned up the Kubernetes manifests so it was shareable with the world.

    It’s noteworthy that after an entire month of running Mastodon, our infrastructure and configuration are finally ready for the world to see:

  • Building a Bitcoin-Powered Donation System for Satoshi Radio: The Journey and Tech Behind It

    Building a Bitcoin-Powered Donation System for Satoshi Radio: The Journey and Tech Behind It

    Satoshi Radio is a weekly podcast about Bitcoin & Cryptocurrencies from The Netherlands. In Dutch, they discuss recent news, new technologies, and other events around Bitcoin as a whole.

    At the beginning of 2020, the podcast host, Bart, decided to set up his first node. The reason to do this was simple: to have skin in the game. Since Bart is not a programmer, he used the all-in-one software MyNode. MyNode is node software that runs on a Raspberry Pi and includes extra tools like BTCPay Server, Mempool explorers, and Lightning wallets. After the node was synced, the community started the idea to raise donations using BTCPay Server. I helped set up the initial minimum viable product: a donation button that could be reached via the website. 

    The MVP was a success, so Bart and I sat together to discuss the next steps. The first ideas that came to mind were an aesthetically pleasing donation button on the website, a Telegram donation bot, and a database including all relevant donation information. The question became if we should create this ourselves or make use of third-party services. In their rapid growth last year, the question arose how they could connect with their community while also creating a steady stream of income more efficiently.

    Donations often consist of multiple smaller amounts from all over the world. Numerous companies exist, acting as payment gateways, each providing multiple features and possibilities specifically tailored to podcasts. However, being a podcast about Bitcoin, it would make sense to receive donations in Bitcoin.

    Satoshi Radio is an advocate of “being your own bank.” All it takes is a Raspberry Pi computer to bootstrap yourself to the network. No middleman, no companies in between. You’re participating directly as a peer in the massive peer-to-peer network of Bitcoin nodes.

    Bitcoin enables merchants to set up their self-owned payment terminal without complex models run by organizations, taking a cut from your cash flow. Since Bitcoin is borderless and trustless, one could receive Bitcoin from the other side of the world in mere moments.

    Since I’m actively involved in all things related to Bitcoin, I experiment with its many components. I learned about Bart’s idea to start receiving donations using his own Raspberry Pi, and I reached out to him to see if I could help out. We wanted to create a tightly integrated system. Together we created the world’s first Bitcoin-only donation system.

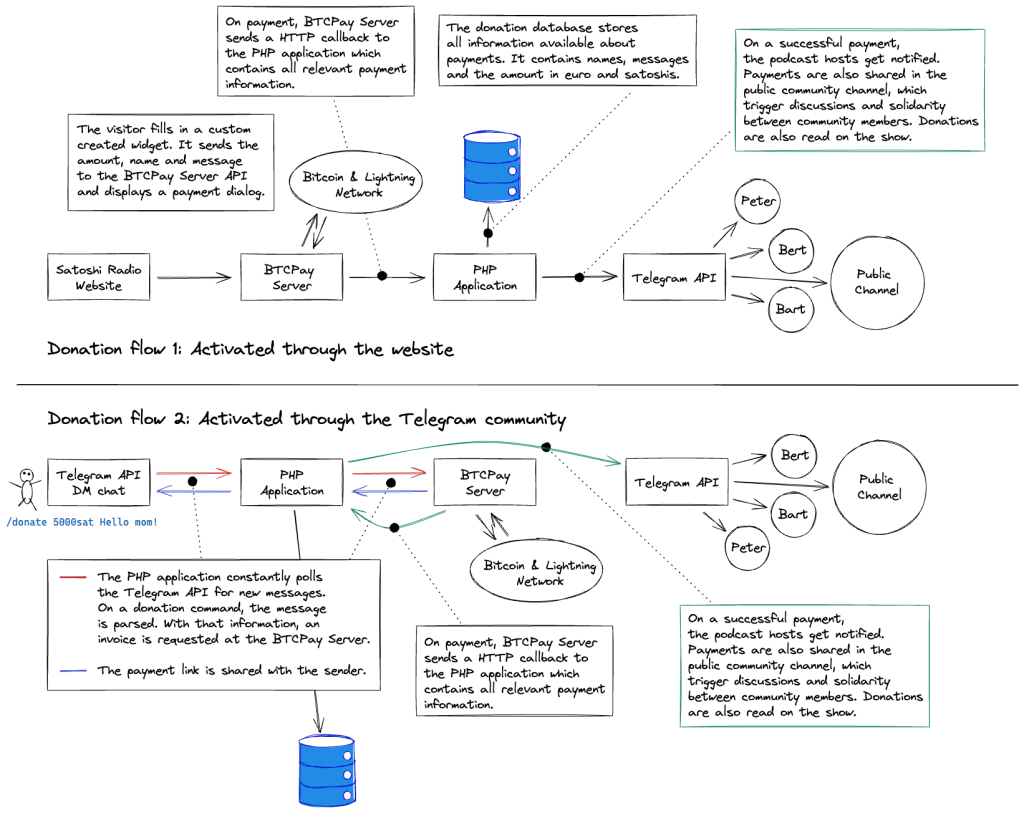
    This post is an effort to detail which components we set up and how they technically interact. 

    The Bitcoin Lightning network

    The lightning network is a second-layer technology applied to Bitcoin that uses micropayment channels to scale its blockchain to conduct transactions more efficiently. Just recently, a member from Satoshi Radio’s community transferred proximately € 9000,00 over the Lightning network. It took about one minute, was confirmed virtually instantaneously, and only cost 0.12% (~€10,00). 

    With most of Satoshi Radio’s listeners running their own nodes and actively participating in the Bitcoin Network themselves, they are also directly hooked into the Lightning Network. For the ones that rather not, there are also custody solutions available.

    BTCPay Server

    From the website: “BTCPay Server is a self-hosted, open-source cryptocurrency payment processor. It’s secure, private, censorship-resistant, and free.”

    BTCPay Server comes as a collection of Docker containers (little pieces of isolated, running software) that handle all things related to payment processing:

    • The Bitcoin Deamon connects directly into the base layer of the Bitcoin Network, validating transactions, redistributing them into the peer-to-peer network, and also sending transactions of its own;
    • The Lightning Deamon (LND) is for hooking into the second layer solution, The Lightning Network. It’s connected to the peer-to-peer network, receiving and sending payments to other connected Lightning nodes. LND uses the Bitcoin daemon to construct payment channels and ultimately settle their balances by closing them;
    • A block explorer (NBXplorer) for indexing the network’s transactions, allowing for quick access to certain information like an address’s balance;
    • A database server (PostgreSQL) for storing information related to the merchant, like store data, information about the paying entity, and invoices.

    BTCPay Server comes with a lot more optional add-ons, but they fall outside of the scope of this post.

    The donation application, an overview

    The application is custom-written software, set up using PHP and Symfony. It exposes several HTTPS endpoints that are called by BTCPay Server when events happen. Communication between the application and BTCPay Server is secured by using client & server SSL certificates.

    When a donation is received, several processes start to move;

    • Its value in EUR is determined using the CoinRanking API;
    • The podcast hosts, Bart, Peter & Bert, are notified of the incoming donation;
    • The public Telegram channel is notified of the incoming donation;
    • Information about the donation is stored in a PostgreSQL database. This includes origin, the amount in euro & satoshis at the time of donating.

    Registration is done so the system can generate a tax report of all donation-related income.

    The Telegram community

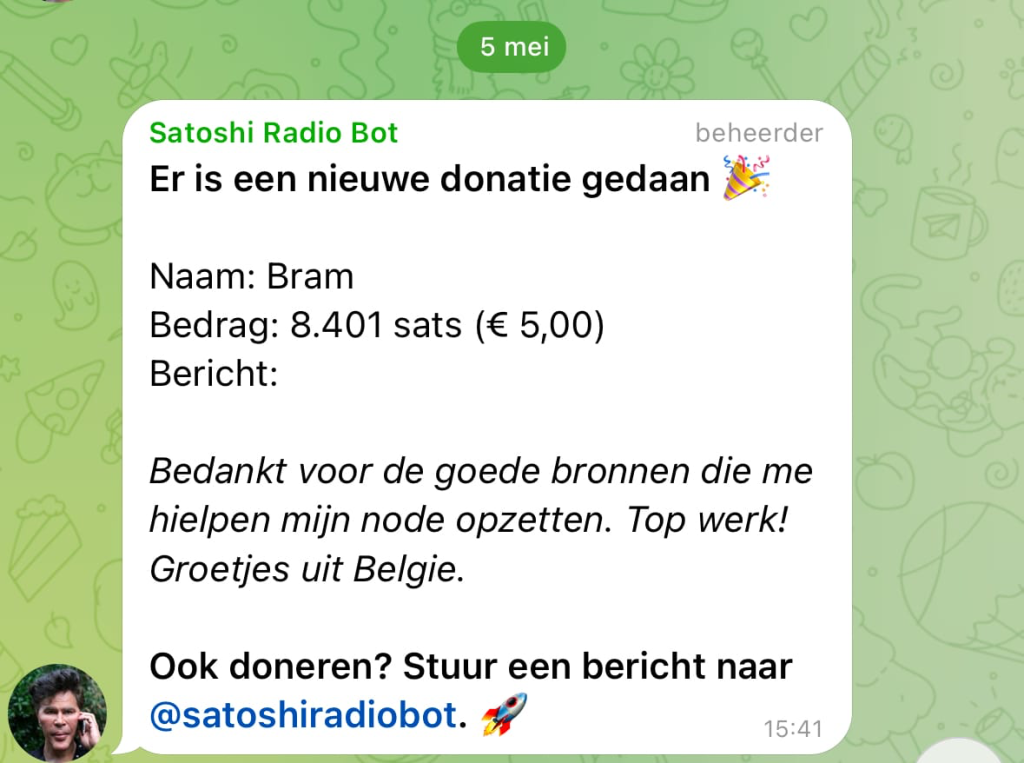
    Here’s how a donation(in Dutch) looks in the public community channel

    The community is where it’s at. At the time of writing, there are 2.270 members in Satoshi Radio’s chat. There’s always something happening here, whether it’s a friendly chat, serious discussion about Bitcoin, or miscellaneous life-related topics. I used to follow closely during the bear market of 2018/2019, but it’s so high-volume now I usually cherry-pick only certain discussions.

    As soon as a payment comes through, the application posts a prominent message for everyone to see. Bart quite suitably chose Igor Bogdanoff’s “Pamp it” meme as the bot’s profile picture. 

    The message holds just three basic things: The name, how much was donated, and a custom greeting or message. Typically, donations contain questions that spark interesting discussions amongst members. Ultimately, when the donation gets read aloud on the show, the hosts go in-depth on the subject. Of course, we show the Satoshi value of the donation first; Sats the standard.

    The donation bot

    The application continuously polls the Telegram API to check if there are new messages. It does so using this iteration function:

    protected function loop($lastUpdateId = null): void
    {
        // [...] irrelevant code
    
        $updates = $this->api->getUpdates($updatesMethod);
    
        foreach ($updates as $update) {
            try {
                switch ('private' === $update->message->chat->type) {
                    case 'private':
                        $account = $this->createOrFetchAccountForTelegramUser($update);
                        $event = new TelegramPrivateMessageUpdateEvent($update, $account);
    
                        break;
    
                    default:
                        continue 2;
                }
    
                $this->dispatcher->dispatch($event);
            } catch (Throwable $exception) {
                // [...] error handling
            }
    
            $lastUpdateId = $update->updateId + 1;
        }
    
        $lastUpdate->setValue($lastUpdateId);
        $this->entityManager->persist($lastUpdate);
        $this->entityManager->flush();
    
        // restart the bot loop after an hour to prevent memory leaks
        if (time() > ($this->start + 3600)) {
            $this->logger->info('bot poll cycle! (1 uur cutoff)');
    
            return;
        }
    
        $this->loop($lastUpdateId);
    }

    I put together a framework within the application for consuming various telegram commands, each triggering different behavior.

    The Satoshi Radio website

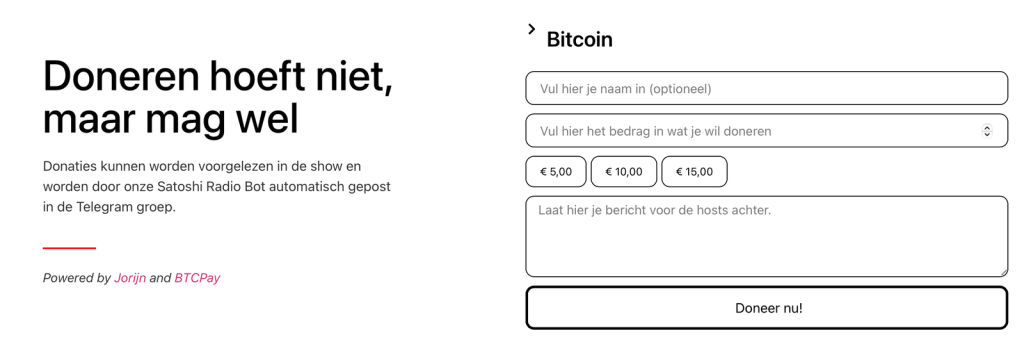
    Though there’s a vibrant community using Telegram, initially, we launched donations only on the website. Visitors can input their name, the amount they wish to donate, and a friendly message to the community and the hosts.

    Building upon the earlier created framework

    class DonationPaidEvent extends Event
    {
        protected Donation $donation;
    
        public function __construct(Donation $donation)
        {
            $this->donation = $donation;
        }
    
        public function getDonation(): Donation
        {
            return $this->donation;
        }
    }

    The application is built using numerous events, triggers, and listeners. When we want to expand on some behavior, all it takes is hooking into an already available event source and create our feature. We recently added a feature to print receipts to be read aloud in the show as soon as a donation comes in—a really cool way of connecting the digital with the physical.

    Conclusion

    It’s been just over a year since I created the first iteration of the donation system. Since then, the system has processed over 1.000 donations, totaling nearly 0,25 BTC, worth almost $12.000 against today’s prices. It’s been rock-solid all this time and has significantly increased the strength of Satoshi Radio’s community while boosting the podcast’s income stream.

    As it turns out, cutting out the middleman and utilizing Bitcoin’s full potential opens up a lot of (cashflow) potential for creative people. All components and software used are free and open-source; it only took some software glue to connect the already readily available components.

    I had a lot of fun creating this project. If you need me to help out with your next idea, view my services or contact me!

  • Installing the NGINX reverse proxy with an SSL certificate for Umbrel / BTCPay Server

    Installing the NGINX reverse proxy with an SSL certificate for Umbrel / BTCPay Server

    Run your personal Bitcoin and Lightning Network node, self-host open source apps, cut out the middlemen, and use Bitcoin to its full potential. For free. — Umbrel

    Update 2023 May 23th: This guide has been used very often and has since been online for nearly two years. A lot has changed in Umbrel, and people have reached out to me that it isn’t compatible anymore. Please use this guide as a general direction to proceed into, but it shouldn’t be used as direct instructions anymore.

    Prerequisites

    • A fully installed Umbrel node;
    • The BTCPayServer app is enabled;
    • You have a domain name configured for your website.

    For this manual, I will use the following values for examples;

    • The home IP is 100.100.100.100;
    • The internal IP (of Umbrel) is 10.10.10.10;
    • The domain name is jorijn.com;
    • The desired domain for BTCPay Server is btcpay.jorijn.com.

    Step 1: Pointing the domain name to your home IP address

    Navigate to the control panel your domain owner offers. You should edit its DNS zone and add a new record:

    Note: The changes could take up to 24 hours to propagate throughout the internet. It would be best if you only continued with this manual when the update is visible.

    Step 2: Verifying the DNS change from step 1

    You can use this online tool to check if the DNS update has propagated throughout the internet.

    https://dnschecker.org/#A/btcpay.jorijn.com

    Step 3: Adding a port forwarding to your local router

    To accept payments and issue an SSL certificate to your domain, your Umbrel should be partially reachable from the internet. Therefore, we need to open up specific ports on your internet router. The specifics depend on the make and model of your internet router.

    First, you need to find out what the internal IP address is of your Umbrel node. Using SSH:

    umbrel@umbrel:~ $ ip addr show wlan0
    3: wlan0: <BROADCAST,MULTICAST,UP,LOWER_UP> mtu 1500 qdisc pfifo_fast state UP group default qlen 1000
        link/ether dc:a6:32:a4:91:8c brd ff:ff:ff:ff:ff:ff
        inet 10.10.10.10/24 brd 192.168.121.255 scope global dynamic noprefixroute wlan0

    In this case, 10.10.10.10 is the internal IP address.

    Note: This Umbrel installation is connected using WiFi; therefore, the interface name is wlan0. If your Umbrel node is connected using an ethernet cable, the interface name should be eth0.

    Next, create two port forwardings in your internet router. The router in this illustration uses a mobile app;

    You need the following port forwardings:

    • Name: BTCPay NGINX HTTP
      IP address: 10.10.10.10
      Source port: 80
      Destination port: 15080
      Protocol: TCP
    • Name: BTCPay NGINX HTTPS
      IP address: 10.10.10.10
      Source port: 443
      Destination port: 15443
      Protocol: TCP

    Step 4: Installing NGINX & Certbot

    Before installing, update your package repository list.

    umbrel@umbrel:~ $ sudo apt update
    [sudo] password for umbrel:
    Hit:1 http://deb.debian.org/debian buster InRelease
    Get:2 http://deb.debian.org/debian-security buster/updates InRelease [65.4 kB]
    Hit:3 http://archive.raspberrypi.org/debian buster InRelease
    Get:4 http://deb.debian.org/debian buster-updates InRelease [51.9 kB]
    Hit:5 https://download.docker.com/linux/debian buster InRelease
    Fetched 117 kB in 2s (65.9 kB/s)
    Reading package lists... Done
    Building dependency tree
    Reading state information... Done
    6 packages can be upgraded. Run 'apt list --upgradable' to see them.

    Then, install the required components.

    umbrel@umbrel:~ $ sudo apt install python3-acme python3-certbot python3-mock python3-openssl python3-pkg-resources python3-pyparsing python3-zope.interface python3-certbot-nginx nginx
    Reading package lists... Done
    Building dependency tree
    Reading state information... Done
    python3-pkg-resources is already the newest version (40.8.0-1).
    python3-pkg-resources set to manually installed.
    The following additional packages will be installed:
      certbot libgd3 libnginx-mod-http-auth-pam libnginx-mod-http-dav-ext libnginx-mod-http-echo libnginx-mod-http-geoip libnginx-mod-http-image-filter libnginx-mod-http-subs-filter libnginx-mod-http-upstream-fair libnginx-mod-http-xslt-filter
      libnginx-mod-mail libnginx-mod-stream libpython-stdlib libpython2-stdlib libpython2.7-minimal libpython2.7-stdlib libxpm4 libxslt1.1 nginx-common nginx-full python python-minimal python-pyicu python2 python2-minimal python2.7 python2.7-minimal
      python3-configargparse python3-configobj python3-future python3-josepy python3-parsedatetime python3-pbr python3-requests-toolbelt python3-rfc3339 python3-tz python3-zope.component python3-zope.event python3-zope.hookable

    The installation will fail; this is expected behavior. It is happening because Umbrel is already claiming port 80. Therefore, we need to change this in the configuration and finish the installation.

    umbrel@umbrel:~ $ sudo sed -i 's/80 default_server/15080/g' /etc/nginx/sites-available/default

    Then, finish the installation.

    umbrel@umbrel:~ $ sudo apt install -f

    After this, you should see a running NGINX welcome page on http://10.10.10.10:15080/.

    Step 5: Creating the BTCPay Server configuration for NGINX

    Create a new configuration file:

    umbrel@umbrel:~ $ sudo nano /etc/nginx/sites-available/btcpay
    

    Paste in the following contents:

    proxy_buffer_size          128k;
    proxy_buffers              4 256k;
    proxy_busy_buffers_size    256k;
    client_header_buffer_size 500k;
    large_client_header_buffers 4 500k;
    http2_max_field_size       500k;
    http2_max_header_size      500k;
    
    map $http_upgrade $connection_upgrade {
        default upgrade;
        ''      close;
    }
    
    server {
        server_name btcpay.jorijn.com;
    
        location / {
            proxy_pass http://127.0.0.1:3003;
            proxy_set_header Host $host;
            proxy_set_header X-Real-IP $remote_addr;
            proxy_set_header X-Forwarded-For $proxy_add_x_forwarded_for;
            proxy_set_header X-Forwarded-Proto $scheme;
            proxy_set_header Upgrade $http_upgrade;
            proxy_set_header Connection $connection_upgrade;
        }
    
        listen 15080;
        listen [::]:15080;
    }
    

    Note: Pay attention to changing the desired domain name in this configuration file.

    Save the file (CTRL+O) and exit the editor (CTRL+X).

    Then, enable the configuration:

    umbrel@umbrel:~ $ sudo ln -s /etc/nginx/sites-available/btcpay /etc/nginx/sites-enabled/
    

    Test the validity of the configuration using:

    umbrel@umbrel:~ $ sudo nginx -t
    nginx: the configuration file /etc/nginx/nginx.conf syntax is ok
    nginx: configuration file /etc/nginx/nginx.conf test is successful
    

    Then, reload the configuration.

    umbrel@umbrel:~ $ sudo systemctl reload nginx.service
    

    Step 6: Request a new SSL certificate from LetsEncrypt

    Request a new certificate from LetsEncrypt.

    umbrel@umbrel:~ $ sudo certbot --nginx -d btcpay.jorijn.com -m jorijn@jorijn.com --agree-tos --tls-sni-01-port 15443 --http-01-port 15080
    

    Note: Make sure to replace jorijn@jorijn.com and btcpay.jorijn.com with your own email address and domain.

    When Certbot asks you about redirecting, choose 1: No redirect.

    Step 7: Manually add the HTTP-redirect

    The goal of this step is to force users to use our new, secure, connection to BTCPay Server. When you add this block, all traffic headed for the non-secure port 15080 will be redirected through HTTP to secure port 15443.

    Open up the configuration file again:

    umbrel@umbrel:~ $ sudo nano /etc/nginx/sites-available/btcpay
    

    Then, at the end of the file, add this server block:

    server {
        if ($host = btcpay.jorijn.com) {
            return 301 https://$host$request_uri;
        }
    
        listen 15080;
        listen [::]:15080;
    
        server_name btcpay.jorijn.com;
        return 404;
    }
    

    Note: Replace the two occurrences of btcpay.jorijn.com.

    Then, validate & reload the configuration:

    umbrel@umbrel:~ $ sudo nginx -t
    nginx: the configuration file /etc/nginx/nginx.conf syntax is ok
    nginx: configuration file /etc/nginx/nginx.conf test is successful
    umbrel@umbrel:~ $ sudo systemctl reload nginx.service
    

    Your BTCPay Server should now be accessible using SSL at: https://btcpay.jorijn.com/.

    The Pay Button

    BTCPay Server will now intelligently use the requesting domain and protocol to generate the example code, and you’re off to accepting payments on your website.

  • Technical background on Bitcoin DCA: self-hosted tooling for Dollar Cost Averaging with Bitcoin

    Technical background on Bitcoin DCA: self-hosted tooling for Dollar Cost Averaging with Bitcoin

    An introduction

    I put aside a small portion of my income in Bitcoin every month. I used to do this with an automated service called Bittr. Their goal was to be easy to use. You would set up a recurring bank transfer, and when the money came in, they would automatically convert it into Bitcoin and transfer it to your wallet. Unfortunately, when the Anti-Money Laundering Bill (AMLD5) came into effect, they decided to shut down on matters of principle and hefty registration fees.

    While seeking a replacement, I quickly found none. I decided to jump in and create a free-to-use open-source application.

    What goal was I trying to achieve

    The tool I was designing would have to do the following things:

    • Effortlessly buy Bitcoin in an unattended matter;
    • Be able to communicate with multiple exchanges through their API;
    • Be able to recurringly withdraw purchased Bitcoin from the exchange into a configured wallet;
    • Be able to generate a new fresh wallet address for privacy purposes from a Master Public Key;
    • It should run everywhere. Expecting people to install and configure several PHP components properly is a hassle.

    Supporting multiple exchanges using Symfony service tags

    My heart belongs to BL3P. It’s a simple, no-nonsense exchange established in The Netherlands. At first, this was the only exchange Bitcoin DCA supported. Quickly, I realized it would benefit the tool’s future if I created a system where the project would support multiple exchanges. I started designing interfaces to abstract behavior from the technical specifics each platform required. I came up with these interfaces:

    • BuyServiceInterface
    • WithdrawServiceInterface
    • BalanceServiceInterface
    • WithdrawAddressProviderInterface

    Each exchange implementation of the given interface gets marked using Symfony’s service tags. When using Symfony’s Dependency Injection container, you can configure it to get all the tagged services and inject them as an argument into the configured service. For example:

    service.buy.bitvavo:
      class: Jorijn\Bitcoin\Dca\Service\Bitvavo\BitvavoBuyService
      tags:
        - { name: exchange-buy-service }
    
    service.buy.bl3p:
      class: Jorijn\Bitcoin\Dca\Service\Bl3p\Bl3pBuyService
      tags:
        - { name: exchange-buy-service }
    
    service.buy.kraken:
      class: Jorijn\Bitcoin\Dca\Service\Kraken\KrakenBuyService
      tags:
        - { name: exchange-buy-service }

    These are all the available implementations of the BuyServiceInterface . The coordinating service for issuing buy orders gets them injected like this:

    service.buy:
      class: Jorijn\Bitcoin\Dca\Service\BuyService
      arguments:
        - !tagged_iterator exchange-buy-service
        - "%env(EXCHANGE)%"

    Eventually, all instantiated objects get injected into the BuyService using its constructor. The code doesn’t need to know about available exchanges and which one the user prefers. It’s all nicely abstracted away into the configuration. The result is:

    class BuyService
    {
        /** @var BuyServiceInterface[]|iterable */
        protected $registeredServices;
        protected string $configuredExchange;
    
        public function __construct(iterable $registeredServices, string $configuredExchange) {
            $this->registeredServices = $registeredServices;
            $this->configuredExchange = $configuredExchange;
        }
    
        public function buy(int $amount, string $tag = null): CompletedBuyOrder
        {
            foreach ($this->registeredServices as $registeredService) {
                if ($registeredService->supportsExchange($this->configuredExchange)) {
                    return $registeredService->initiateBuy($amount);
                }
            }
    
            throw new NoExchangeAvailableException('some descriptive error here');
        }
    }

    Generating a new wallet address for each withdrawal

    In Bitcoin, it’s considered good privacy to use a new address for each transaction. The blockchain is public, and reusing earlier used addresses could tell others your balance and behaviors. Most modern software provides Hierarchical Deterministic (HD) wallets. In short, one single key can generate a hierarchical tree-like structure of multiple private/public keys. My goal was to leverage this so every time a user would request a withdrawal, the tool would provide a new, unused address.

    A new problem arose, how would the tool know if an address was previously used or not? This information is available since Bitcoin saves every transaction in the public blockchain. The need to know poses a few concerns:

    • Infrastructural: You would need a blockchain index to query. There are two options available:
      • I would have to provide a hosted service to figure out if transactions exist on the given address.
      • The user would have to host such a service themselves.
    • Psychological: I don’t want to be able to know if an address is active already. The Bitcoin community is rigorous in who they trust. Preferably no one.

    The infrastructural argument increases complexity enormously. Bittr solved this problem by hosting the service themselves, but this wasn’t a perfect option since I want the tool to operate without any dependencies linking back to me.

    There was another option. Admittedly, it’s not very pretty and prone to error, but it provides trustless and functional requirements. I would document my recommendation to create a new wallet for the sole purpose of using my software. I could reasonably assume the first address is unused and increment an internal counter whenever the user requests a withdrawal.

    Thinking about how to run the application on a bunch of different configurations

    If you have ever developed any PHP application, you know this isn’t pretty. The upside is that PHP is readily available on the system most of the time or that it’s easy enough to arrange so. The downside is you don’t know the person maintaining the system, how often they upgrade, and which upstream repositories they use. PHP 7.4 was stable when writing the application, so I wanted to use typed properties, arrow functions, spread operators, etcetera. I couldn’t possibly assume everyone would be up to date.

    I chose Docker: Most modern operating systems run it, and Docker gives me a predictable set of libraries and dependencies to launch my application. It’s portable and allows for multi-architectural builds. The minimal viable product (MVP) doesn’t require a graphical user interface, so the plan was to package it as a CLI application.

    There’s one caveat: Containers are ephemeral—lack of persistency and state management force the developer to think about the application’s life-cycle and how one should feed configuration and process results.

    Symfony provides good support for consuming configuration through environment variables and suits nicely in the context of containers. For more advanced functionality that does require persistency, I could document a volume mount for storage.

    Using Docker’s multi-stage builds, I can also consistently prove every part of the application works before shipping. My Dockerfile contains four stages:

    • The dependency stage is a preparatory layer for the final image. Here, all dependencies get installed using Composer. Ultimately, this layer gets thrown away since we only need the dependency folder, not the entire layer.
    • The base stage is where the previous step’s dependencies are copied over and where the required PHP extensions are installed. For ease, this stage builds upon the existing “php:7.4-cli-alpine” image.
    • The test stage builds upon the base stage. It copies development settings for PHP and runs all available tests. The goal is to ensure the build doesn’t succeed when a part of the application shows unintended behavior.
    • The production stage is based upon the base stage and purposely skips the added development files added in the test stage. Docker will only reach this stage if all tests succeed. Here, production config & entry points get added, and the container is pre-compiled for performance reasons.

    The final result is a tested image that behaves consistently for everyone:

    $ docker run --rm -it \
        -e SOME_CONFIG1=value1 \
        -e SOME_CONFIG2=value2 \
        jorijn/bitcoin-dca:latest buy 10

    The Raspberry Pi problem

    A little while after I launched the tool publicly, some issues came in. As it turned out, Raspberry Pi computers are excellent little devices to run Bitcoin DCA on: They run Linux, are small, and most important: Available 24/7 for a recurring schedule. The caveat: most Raspberry Pi’s run ARMv7 architecture, which is 32-bit.

    The first obstacle: The library I was using for Key Derivation was unable to work since 32-bit PHP cannot handle large integers. On 64-bit PHP, the library allows me to supply a Master Public Key and provide it with an index integer. It will return the corresponding private/public keypairs to process the address for withdrawal.

    32-bit PHP unable to handle big integers to derive private/public keys turned out to be a tricky problem. I spent several nights trying suggestions and searching on Google to find a cure for this bug. Ultimately, I didn’t find one. I soon learned that Python has many libraries for working with Bitcoin that run on 32-bit systems. In collaboration with my friend, we quickly whipped up a simple script that accepts a Master Public Key, offset, and length parameter and returns a list of recipient addresses.

    The second obstacle: How would I connect the two? I would need some bridge connecting the two APIs for exchanging information. HTTP or TCP wasn’t suitable here since the ephemeral nature of containers. Starting a daemon to handle API traffic and spawning another process to talk from seemed daunting and complicated. I settled on another CLI script: Thanks to Docker, I know the filesystem structure, where the Python tool would be, and which dependencies are available.

    The third obstacle: How would I provide a graceful fallback during runtime when 32-bit PHP is detected? I decided on leveraging Symfony’s service tag’s again here. The interface I designed looks like this:

    interface AddressFromMasterPublicKeyComponentInterface
    {
        public function derive(string $masterPublicKey, $path = '0/0'): string;
    
        public function supported(): bool;
    }

    It consists of two methods: derive and supported. One great thing about service tags is that you can prioritize them. I created two implementations of this interface. 1) the solution native to the application and 2) falling back to executing the Python CLI tool on the system level.

    component.derive_from_master_public_key_bitwasp:
      class: Jorijn\Bitcoin\Dca\Component\AddressFromMasterPublicKeyComponent
      tags:
        - { name: derive-from-master-public-key, priority: -500 }
    
    component.derive_from_master_public_key_external:
      class: Jorijn\Bitcoin\Dca\Component\ExternalAddressFromMasterPublicKeyComponent
      tags:
        - { name: derive-from-master-public-key, priority: -1000 }

    The native solution prioritizes first. It checks if PHP_INT_SIZE it equals 8, meaning the system is 64-bit capable. If not, the application proceeds to the next available PublicKeyComponent.

    public function supported(): bool
    {
        // this component only works on PHP 64-bits
        return \PHP_INT_SIZE === 8;
    }

    The Python solution comes last since it’s always supported. I decided against solely using the Python solution since it was very slow compared to the native PHP solution. Using a Factory pattern injected with all tagged PublicKeyComponents, I could return the interface implementation while the requesting service doesn’t need to know the specifics:

    public function createDerivationComponent(): AddressFromMasterPublicKeyComponentInterface
    {
        foreach ($this->availableComponents as $availableComponent) {
            if (true === $availableComponent->supported()) {
                return $availableComponent;
            }
        }
    
        throw new NoDerivationComponentAvailableException('no derivation component is available');
    }

    The DI container nicely handles the logic for setting up the service using the factory:

    component.derive_from_master_public_key:
      class: Jorijn\Bitcoin\Dca\Component\AddressFromMasterPublicKeyComponentInterface
      factory:
        [
          "@factory.derive_from_master_public_key.component",
          "createDerivationComponent",
        ]

    Why code quality and tests matter

    I get it; writing tests is tedious work. It’s not fun, and developers don’t like it. Most often, writing a good unit test that covers all logical paths in the code could take up to 100-200% of the time initially needed for the component itself.

    Tests make it easier for us to refactor code. Over time projects change. Unit tests verify that updates to code won’t break any existing functionality that has previously been thoroughly tested. We can refactor code and run our tests to ensure that it still works as originally intended.

    Most developers know that colleague that continually plagues them about maintaining consistent code quality. We grunt, sigh, and secretly know they are right. I solely support Bitcoin DCA, and unfortunately, I don’t have that colleague. I recruited a replacement in an automated online system called SonarQube, which provides gatekeeper functionality for quality. It continuously inspects my code and warns me about issues in maintainability, reliability, and security. The best thing? It’s verifiable for everyone to see.

    When writing this article, 92.3% of Bitcoin DCA’s codebase is covered by tests, and there are little to no issues regarding maintainability / technical debt. I’m proud of this project as it’s a genuine representation of how I think code quality and test coverage should be.

    Conclusion

    I learned a lot by creating Bitcoin DCA. I never knew 32-bit architecture was still active in 2020. The Dutch Bitcoin community has been great in supporting me. Not long after the initial launch, I even got a few mentions on Dutch news media.

    What’s next

    In the next couple of months, I’m looking to complete/implement these new features:

    • Notifications of completed orders through email or instant messaging.
    • Kraken recently announced they would be supporting withdrawals through Bitcoin’s Lightning network somewhere in 2021. I think this is a great use case for Bitcoin DCA.

    Give Bitcoin (DCA) a try

    I wrote detailed documentation on how to use Bitcoin DCA yourself. Visit the repository and download/inspect the code here